How To Migrate From Windows XP To Windows 7
Farewell, Windows XP
With the April 8 end date for Windows XP support approaching fast, companies large and small should have begun preparations long ago. According to Microsoft's end of Windows XP SP3 and Office 2003 page, the average time to plan and implement an enterprise transition from Windows XP to Windows 7 is between 18 and 32 months. Companies that start planning now might see a new U.S. president elected before they're done.
Unfortunately, WinXP to Win7 is not among the direct upgrade paths for Windows XP. It can be done by going to Vista first, but that only works with certain systems, takes more time than other methods, and supports only 32-bit versions of the source and destination. In other words, if any 64-bit Windows is involved, a clean installation is required. For customers that have waited until the end of support for Windows XP to begin planning their move, the CRN Test Center has documented several ways to upgrade from Windows XP to Windows 7. Click Next for a synopsis of options.
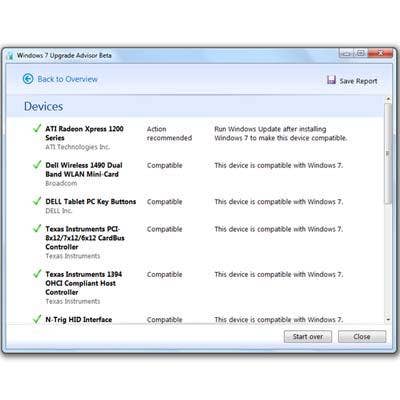
Upgrade Advisor
If the plan is to install Windows 7 onto the same machine that was running XP, you'll need to determine whether it's powerful enough to run Windows 7. We believe that the target machine should have at least an Intel Core 2 or 64-bit dual-core equivalent AMD processor running at a minimum of 1GHz, plus 4 GB of RAM and about 20 GB of available hard drive space. A Core 2 or later also will permit virtualization, but add another 20 GB of storage. Microsoft's system requirements for Windows 7 are a bit less stringent. To help with planning, Redmond recommends a visit to its Upgrade Advisor Page for guidance on app compatibility and links to hardware drivers and to Upgrade Advisor, a free utility that scans the hardware for possible migration issues.
Migration Options
While most organizations likely will choose not to use Vista as a middle step when moving from WinXP to Win7, some of Microsoft's Vista-to-Windows-7 migration tools can still be useful for making the move. Regardless of source or destination versions, it's necessary to perform a so-called clean install. At minimum, this three-phase process backs up vital data from the source computer to external storage, installs Windows 7 on the source drive, and then restores the vital data. Obviously, a middle step is eliminated if source hardware is being replaced by a system with Windows 7 already installed. More on that later, including a method of direct data transfer.
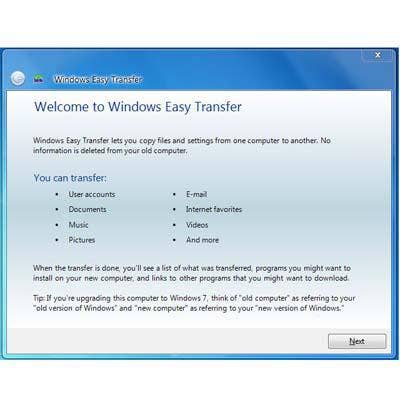
Windows Easy Transfer
The first step is to download Microsoft's Windows Easy Transfer (WET) tool, a free transfer utility for 32- and 64-bit Windows XP or Vista; (WET comes preinstalled on Windows 7). This automatically finds and transfers user profiles, data, passwords and settings. The 9-MB WET for XP installer can be run right from a USB stick onto any number of machines. Run WET on the XP machine being serviced, select the file(s) and user profile(s) to be moved, and save them onto an external storage device. If migrating from an XP machine to a new system with Windows 7 already installed, see the next slide before starting the data copy.

Machine-to-Machine Transfer
If migrating from an XP machine to a new system with Windows 7 already installed, WET (which comes with Win7) can be used to perform a direct file transfer via Ethernet or a LapLink-style cable. With WET running on the source (WinXP) machine, launch it on the destination (Win7) machine from the Accessories > System Tools folder and follow the prompts to create the connection. Then proceed to the next slide.
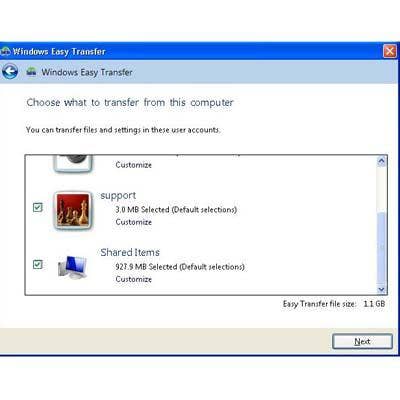
Select Profiles, Data
By default, WET selects all user profiles and copies all data. If necessary, deselect unwanted items and proceed when ready. It's also possible to drill into one or more profiles and select individual files and folders to copy or omit from the transfer (shown next).
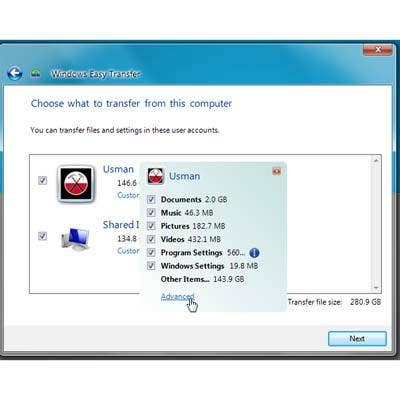
WET File Explorer
Among the improvements Microsoft has bestowed upon Windows Easy Transfer is a file explorer that permits easy selection of data to be migrated or omitted. It's also now more reliable. If something goes wrong during a transfer, for example, WET will compile a list of files it was unable to move. Prior versions simply hung up or became unresponsive when encountering a problem. For migrations to a new Windows 7 machine, skip to slide 9. If reusing the XP machine, click Next.
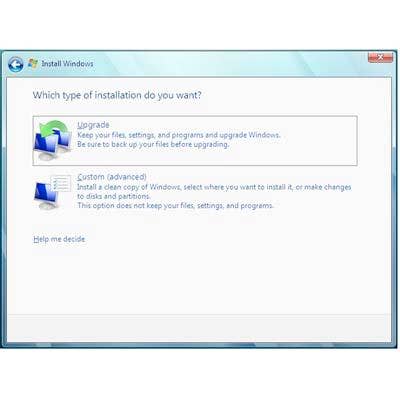
Wiping The Hard Drive
Once all necessary files are safely tucked away on external storage, it's almost time to reformat the hard drive. But first, it's good practice to grab the make and model numbers for as many of the target system's hardware components as possible. At the very least, be sure to record which network and display adapters are present. This ensures that if those components are not properly configured by the Windows 7 install, the system won't be visually crippled and/or unable to connect to the Internet for long. Boot your Windows 7 disc or ISO image and follow the prompts to the selection screen for installation type (shown). Select Custom Install. Attempts to "Upgrade" will fail. Continue to follow prompts and enter information as requested. Once a fresh Windows 7 boots, restoring data comes next.
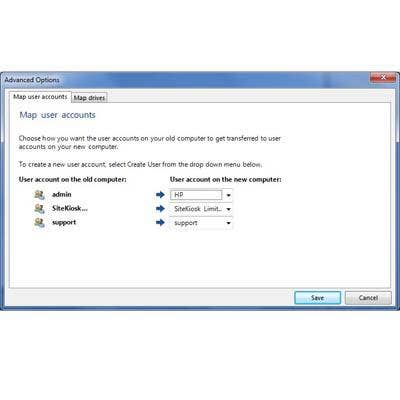
Restore Saved Data
Whether migrating data from an external drive or transferring directly via cable, run Windows Easy Transfer on the target Windows 7 machine by selecting it from Accessories > System Tools. If migrating from an external drive, navigate to the drive and find the profile data file inside something similar to "Items from old computer." Open the profile data file and select "Advanced Options" to map destinations for the incoming data. (The function controls how incoming profiles are mapped to a machine's existing profiles, if any. This is used mainly for migrating data to a machine that had been used previously and contains one or more existing user profiles.) Make appropriate changes and hit Save to proceed.

After The Transfer
Once the transfer is complete, Easy Transfer presents a list of files that were transferred along with a program report (tab shown). This is a list of applications present on the XP machine that were not transferred to Windows 7. Reinstall any required apps from the original media or by download. Check that all peripherals are functional and install drivers as needed. Once this is done, the migration is complete.